
The ICS22 is a smart 22kW single-phase home and commercial EV charger with a built-in RFID reader, Wi-Fi, Ethernet, and Bluetooth connectivity, full OCPP 1.6J support, and automatic fault recovery — everything you need for reliable, intelligent charging in one tidy unit.


Wire and install EV charger and associated hardware according to ICS installation manual. Before you close the enclosure, ensure you look at Step 2 for setting up Ethernet and 4G connections.
If the charger requires 4G connection, you will need to have purchased a 4G SIM card pack from us. Follow the steps below on how to install the SIM card and to connect a LAN cable.
Remember not to use Power over Ethernet (PoE)

It takes ~ 1 minute for the charger to power on and complete self-check processes.
Before powering on please make sure the security screw (at the bottom of the charger) is tightened, otherwise the charger screen will show “Door_Opened” Fault. See below for example.

Connect to the charger Access Point (AP) to access the configuration portal Use a mobile device (phone/tablet) to connect the to charger’s Wi-Fi AP. It should be broadcasting its own Wi-Fi hotspot.
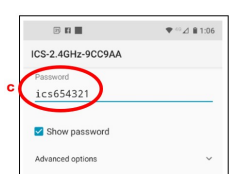
SSID: ICS-2.4GHz-******
Password: ics654321 (this is the default password)
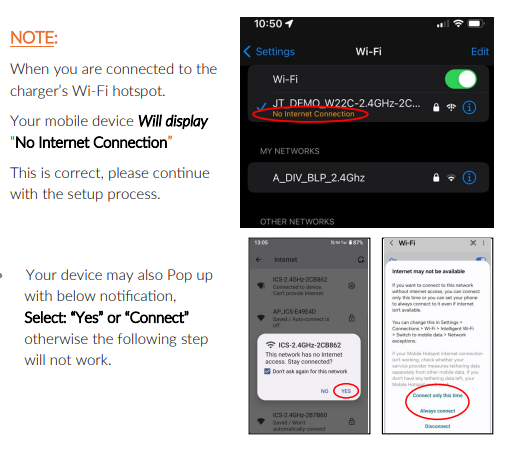
Note: when you are connected to the charger’s Wi-Fi hotspot, your mobile device will display “No internet connection” and is expected. Please proceed as normal.
Username: install
Password: icspass21
Note that these details are default and set up by ICS.
Upon logging in, you will be prompted you to change the password. Once confirmed, you will be asked to login using the new password.
Username: install
Password: [your new password]
If you forget this password, you will not be able to change any settings in the future and the ICS charger will need to be returned to ICS for re-configuration. Please ensure you update it to a memorable password and save it somewhere safe. We would suggest saving it as ‘voltshare’ for simplicity (without ‘ ‘).

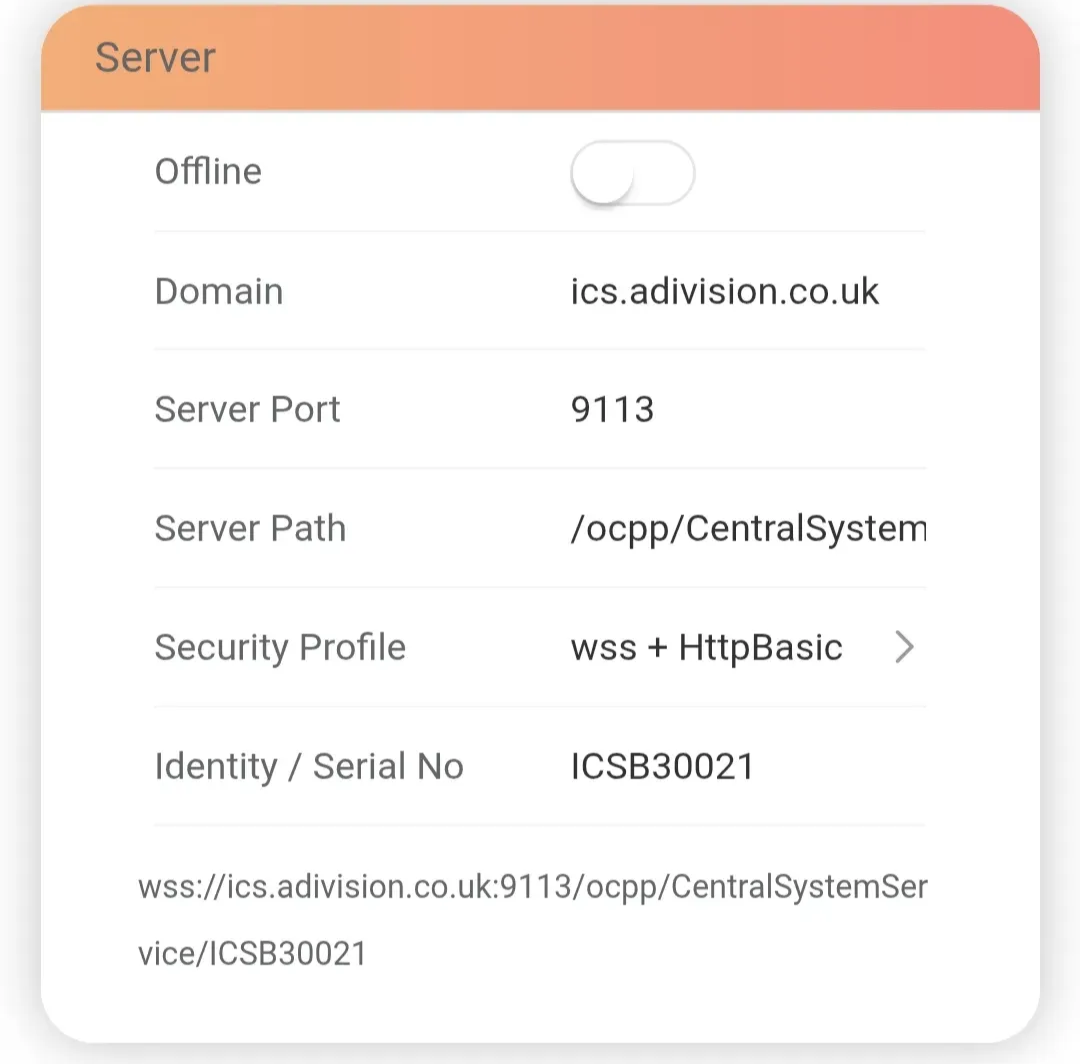
You will now need to enter the details below to link the ICS Charger to our backend service via OCPP. Please request these details from your voltshare representative.
Offline: remain toggled OFF (do not change as toggling this on would bypass OCPP)
Identify/Serial No: Do not change (note down this as this will be required later)
Domain: [request from voltshare]
Server Port: 443
Server Path: /1.6
Security Profile: wss + HttpBasic
Identity/Serial No: DO NOT CHANGE (note this down as it will be required later)
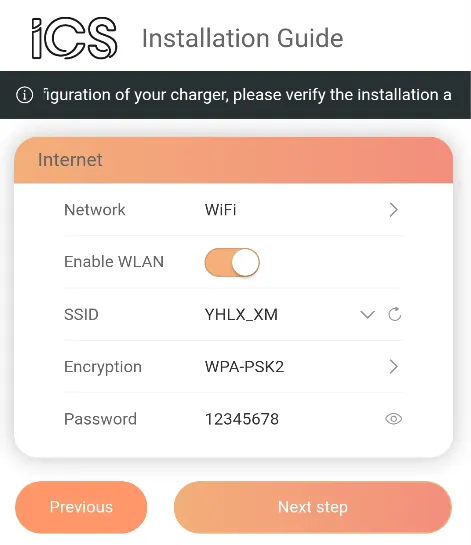
To set up Wi-Fi connection to the local Wi-Fi network, enter details on this page.
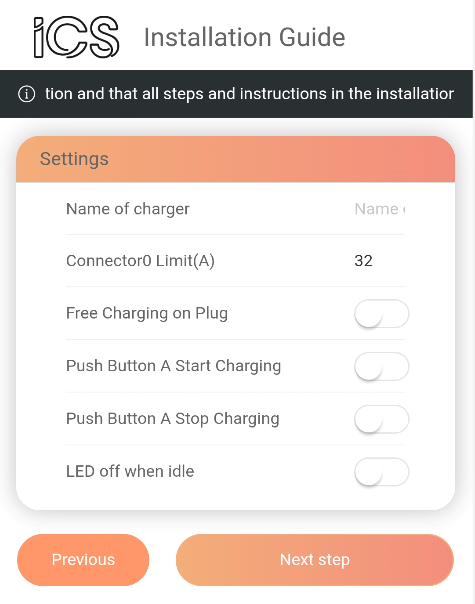
Please ensure the following properties are set up as shown or the charger will not function as intended with the voltshare platform.
Connector0 Limit(A) - Static current limit if required
Free Charging on Plug - toggled OFF
Push Button A Start Charging - toggled OFF
Push Button A Stop Charging - toggled OFF
LED off when idle - toggled OFF
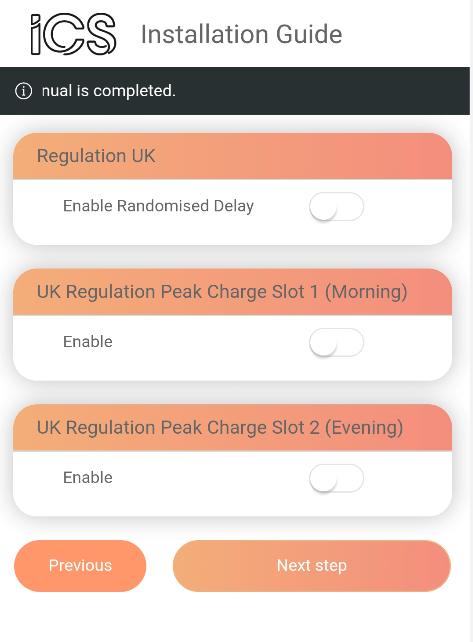
Please ensure the following properties are all turned off or the ICS Charger will not function as intended with the voltshare platform. As these chargers are meant for commercial/public use, having these toggled on will severely affect driver experience.
Enable Randomised Delay - toggled OFF
UK Regulation Peak Charge Slot 1 (Morning) - toggled OFF
UK Regulation Peak Charge Slot 1 (Evening) - toggled OFF
Once you’ve completed it, wait for the device to reboot

After the device has rebooted, please connect to the charger’s Access Point (AP) again; see Step 2 - 4. Remember you will need to have the changed portal login password from Step 4. Once you are logged in, you should see the new setup page below

We recommend connecting to multiple network types to ensure reliable connection to our severs (e.g. 4G + WiFi or 4G + LAN).
If you are using our 4G SIM card, please click on the Network icon under Basic menu and change the 4G section settings:
Enable 4G: Toggle On
APN: simbase
Dial: *99#
Pin code: [leave blank]
User: [leave blank]
Password: [leave blank]

You can also update Wi-Fi settings via WLAN section. Toggle this ON and enter the local Wi-Fi SSID and password.

Ensure the following settings are configured as below. This is important as you will need this to be on so that you can re-configure your charger via its wireless Access Point (AP). Otherwise, you will need to use a Windows laptop and a LAN cable.
Enable: Always On
Channel: Auto
SSID Prefix: ICS
SSID Password (AP): from Step 4 when you first logged in and updated it

To allow the charger to switch between the available network options (Ethernet, Wi-Fi, 4G), toggle ON Enable Switch.

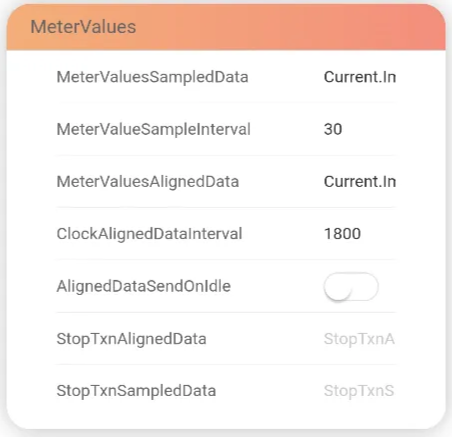
Go back to the main menu and click on the OCPP icon under the Advanced section and change the following fields then click on Submit.
MeterValueSampleInterval: 30
AlignedDataSendOnIdle: Toggle on
UnitPower: W
UnitEnergy: Wh
You can confirm if the charger has internet connection by going to the Information icon under System menu. This example below shows the charger is connected via 3G mobile internet. The network(s) to which the charger is connected will be populated.

Place the QR code sticker on a flat surface of the EV charger; we cannot guarantee a seamless driver experience if the QR code sticker is placed elsewhere e.g. do not place it on the wall or on the post.
Affix the aluminium di-bond sign on the wall or post; this provides the driver with clear instructions on how to charge; as above, we cannot guarantee a seamless driver experience if this is not done.
Call 0808 303 0629 and provide us with the following details to confirm the EV charger is live on our platform.
voltshare Charger ID: found on the QR code sticker
ICS Identity / Serial No: found in the ICS portal (see OCPP)
Take photos of the install and charger ID, parking space, and fuseboard from where the EV charger is wired. These help us provide owners and drivers more personalised experience.
The owner must now register the voltshare Charger ID on their app.
Ensure the EV charger is powered on and go close to it and enable Wi-Fi on your phone. Check if the below network is available; this is a Wifi Access Point that the charger should be broadcasting at all times, unless the previous installer has turned this off.
Network name: ICS-2.4GHz-******
Password: ics654321
Click to connect on this network
Enter 192.168.10.1 or 192.168.10.1:8081 in the URL field of a web browser (Google Chrome or Safari). The ICS Portal log in page should come up. Use the details below to log in unless you or your installer changed this during the initial setup.
Username: install
Password: icspass21 (this may have been changed during your initial set up and if forgotten, the charger will need to be resent to ICS for re-configuration)
Once you are logged in, you should see the menu page below.
Click on "OCPP" then enter the details below to link the ICS Charger to our backend service via OCPP. Please request these details from your voltshare representative.
Offline: remain toggled OFF (do not change as toggling this on would bypass OCPP)
Identify/Serial No: Do not change (note down this as this will be required later)
Domain: [request from voltshare]
Server Port: 443
Server Path: /1.6
Security Profile: wss + HttpBasic
Identity/Serial No: DO NOT CHANGE (note this down as it will be required later)
Then change the following
MeterValueSampleInterval: 30
AlignedDataSendOnIdle: Toggle on
UnitPower: W
UnitEnergy: Wh
Click on "Regulation" and ensure the following properties are all turned off or the ICS Charger will not function as intended with the voltshare platform. As these chargers are meant for commercial/public use, having these toggled on will severely affect driver experience.
Enable Randomised Delay - toggled OFF
UK Regulation Peak Charge Slot 1 (Morning) - toggled OFF
UK Regulation Peak Charge Slot 1 (Evening) - toggled OFF
Click on "Network" to configure how the EV charger connects to the internet. We recommend connecting to multiple network types to ensure reliable connection to our severs (e.g. 4G + WiFi or 4G + LAN). Please go through this again even if it has already been installed to be sure.
If you are using our 4G SIM card, please click on the Network icon under Basic menu and change the 4G section settings:
Enable 4G: Toggle On
APN: simbase
Dial: *99#
Pin code: [leave blank]
User: [leave blank]
Password: [leave blank]
You can also update Wi-Fi settings via WLAN section. Toggle this ON and enter the local Wi-Fi SSID and password.
This wireless network needs to be on a 2.4GHz band.
To allow the charger to switch between the available network options (Ethernet, Wi-Fi, 4G), toggle ON Enable Switch.
You can confirm if the charger has internet connection by going to the Information icon under System menu. This example below shows the charger is connected via 3G mobile internet. The network(s) to which the charger is connected will be populated.
Place the QR code sticker on a flat surface of the EV charger; we cannot guarantee a seamless driver experience if the QR code sticker is placed elsewhere e.g. do not place it on the wall or on the post.
Affix the aluminium di-bond sign on the wall or post; this provides the driver with clear instructions on how to charge; as above, we cannot guarantee a seamless driver experience if this is not done.
Call 0808 303 0629 and provide us with the following details to confirm the EV charger is live on our platform.
voltshare Charger ID: found on the QR code sticker
ICS Identity / Serial No: found in the ICS portal (see OCPP)
Take photos of the install and charger ID, parking space, and fuseboard from where the EV charger is wired. These help us provide owners and drivers more personalised experience.
The owner must now register the voltshare Charger ID on their app.
It's never just "an EV charger". Find out what accessories are available directly from voltshare, to create your complete and reliable charging solution.
Most commercial EV chargers are situated far away from wireless networks, routers go offline and passwords change. Prevent revenue loss and connection drops with a dedicated IoT SIM card for your EV charger.


If your charger is accessible to members of the public, you may need to support contactless payment. Fear not as these hardware and associated accessories can be purchased directly and are fully integrated with voltshare.


[To be populated]


